Manage Job Applications in SharePoint
This tutorial demonstrates how to automate the administrative burden of managing new hire interviews and job offer follow-ups.
Managing recruitment communication can be a time-consuming and repetitive task for HR teams. Writing and sending interview invitations, offer letters, and rejection notices manually often lead to inconsistencies and human error. This tutorial showcases the capability of Build a Doc in automating the creation and delivery of job application letters using SharePoint and Power Automate.
The video below demonstrates how an HR staff member creates and updates an applicant’s progress in SharePoint, triggering automated letters to be sent directly to applicants based on their application stage. These include an interview letter, offer letter, and a rejection letter.
Prerequisites
- SharePoint site set up ready to add lists to
- Power Platform environment/solution set up
- Power Automate premium licence to be able to run custom connectors
Implementation
This guide uses the ‘Recruitment Tracker’ List template provided by SharePoint which will be the data source for this scenario.
Adding the SharePoint List
-
On the SharePoint Site, click the ’+ New’ and select ‘List’ from the dropdown
-
Scroll down and find ‘Recruitment tracker’ in the Templates section
-
Click ‘Use template’, name it as required, and select the option to show it in the site navigation
![]()
- Add the following columns with the ‘Add column’ button:
- Candidate email (Single line of text)
- Start date (Date and time)
- Work hours (Single line of text)
- Weekly hours (Single line of text)
- Contract length (Single line of text)
- Salary (Currency)
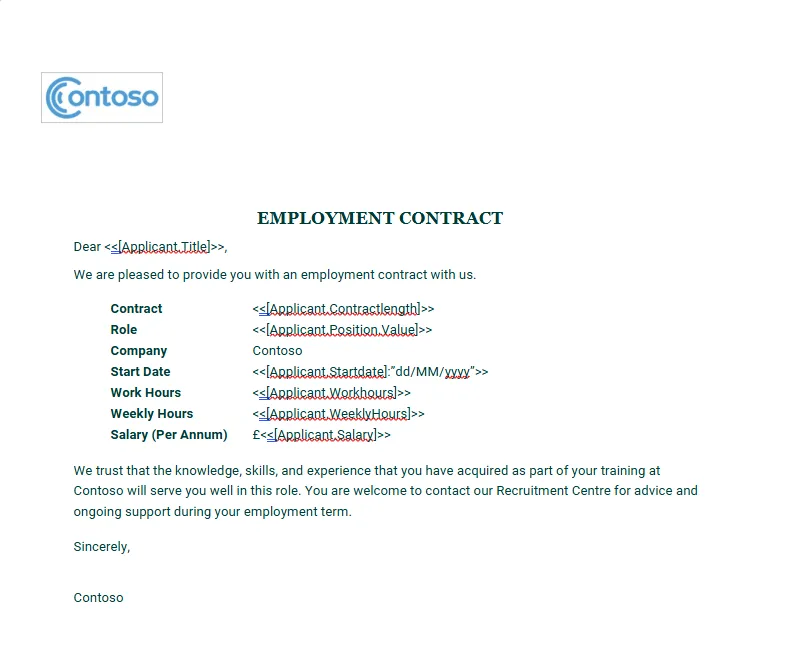
Document Templates
The document templates have been stored in the same SharePoint site for this demonstration so that everything is in one place. The templates in this scenario are an interview letter, offer letter, and a rejection letter. The one that will be used by the flow depends on the “Progress” field of the applicant.
Power Automate Flow
Power Automate Flow is where the Build-a-Doc custom connector will be used to handle the templates and data from SharePoint.
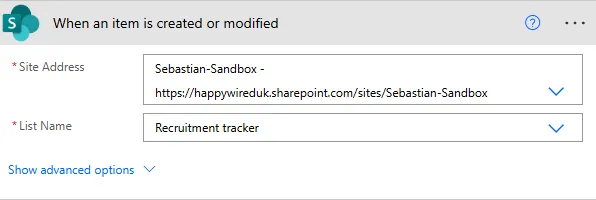
Trigger
Use the SharePoint “When an item is created or modified” trigger. Connect this trigger to the SharePoint site where the list is located.
Actions
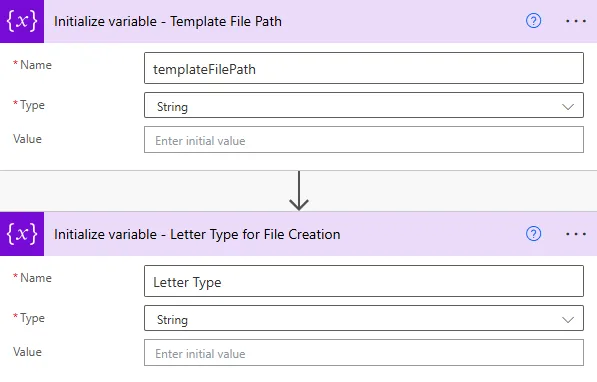
- Initialise variables Use two “Initialise variable” actions for the file path of the template and the type of letter that is being sent out. This prevents having redundant actions in the switch control later, allowing for a single instance of the Build-a-Doc connector rather than reusing the same action across the different switch cases.
- Use a switch control on “Progress” from the trigger. This will be on “Progress” from the trigger. This will let the flow know which template needs to be used to generate the appropriate document for this applicant.

- Under each case, use two “Set variable” actions under each case, for template file path, in the value use the appropriate file path from SharePoint that will link to the appropriate template. For example, “/Shared Documents/Templates/HROfferLetterTemplate.docx”. The second variable “Letter Type” then would be “Offer Letter”. Make sure you use the appropriate values depending on the case you are on.

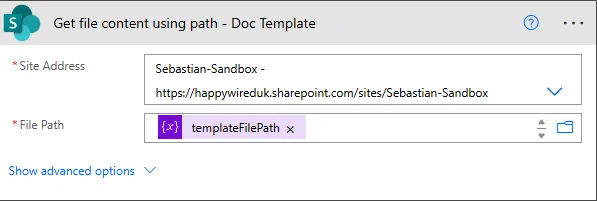
- Get file content using path - Select the SharePoint site where your template is stored from the dropdown, then in value use the variable you set for the file path, i.e. templateFilePath.
-
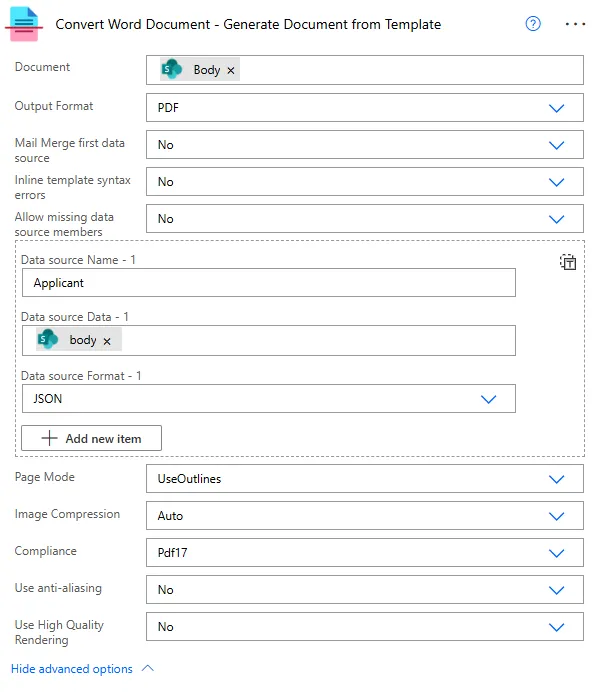
Build a Doc: Convert Word Document action
Use this action to generate the final document using the data retrieved from your SharePoint lists. This action is required because the templates used in this scenario are Word documents.-
Document:
Select File Content and provide the extracted Word template output from the previous action. -
Output Format:
Set this to the required output format (for example: PDF or DOCX).
Expand Show advanced options and configure your data sources as follows:
-
Data source Name:
A meaningful reference name that will be used inside the Word template to access this data source. -
Data source Data:
The raw data to be injected into the template. In this scenario, this should be the body output from the relevant SharePoint Get actions. -
Data source Format:
Set this to JSON, as the SharePoint action outputs are JSON-formatted.
You can add multiple data sources if required. Ensure each data source is clearly and uniquely named so it can be correctly referenced within the template.
-
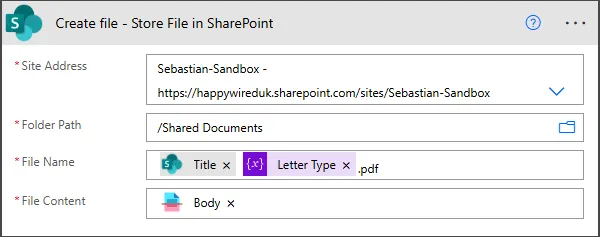
- SharePoint: Create file action
Use this action to save the generated document to your SharePoint site.-
Site Address:
Select the SharePoint site where the file should be created. -
Folder Path:
Choose the folder within the selected site where the document will be stored. -
File Name:
Use a clear and descriptive naming convention that includes the applicant’s title, the applicant’s name, and the letter type.
This makes it easier to identify and distinguish between different generated documents. -
File Content:
Provide the body output from the previous action, which is the Build-a-Doc: Convert Word Document action.
-
- Send an email action
Use this final action to email the applicant their corresponding letter as an attachment.
-
To:
Use the Email field from SharePoint to specify the applicant who will receive the email. -
Subject:
Enter an appropriate subject line for the email.
Dynamic content can be used to reference applicant and vacancy information so the email works for multiple applicants. -
Body:
Enter the email message content.
As with the subject, use dynamic content to personalise the message using applicant and vacancy details.
Expand Show advanced options to configure the attachment:
-
Attachments Name:
Use the Name output from the SharePoint: Create file action.
This ensures the attachment name matches the file stored in SharePoint and includes the correct file extension. -
Attachments Content:
Use the body output from the custom connector (the same output used in the previous action) so the generated document is attached to the email.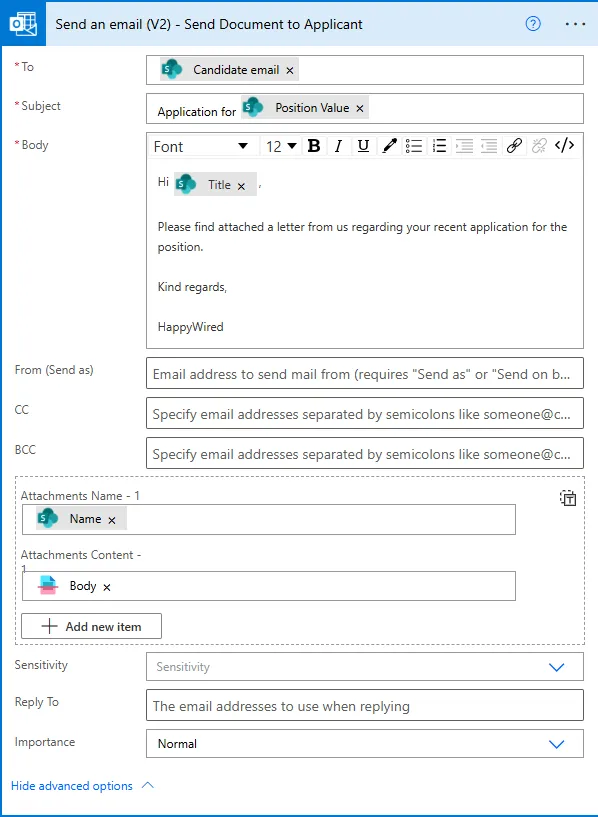
Running the Process
To run the process:
- Create a new item in the SharePoint list
- Fill in all necessary columns including the email
- Set the Status column to a value used in the flow (e.g., ‘Active’, ‘Rejected’)
Actions Used
Convert Word Document
This guide uses the Build a Doc Convert Word Document action, allowing for data to be collected from a data source and dynamically inserted into documents.
See Convert Word Document for full action reference.